 This is a really easy covered button tutorial with the most basic of supplies. No fancy schmancy machine to get to grips with, instead just some old shank buttons, a scrap of cloth and a good old needle and thread. Read the 'how to' after the jump
Showing posts with label craft. Show all posts
Showing posts with label craft. Show all posts
Wednesday, 5 September 2012
Easy Peasy Covered Buttons
This is a really easy covered button tutorial with the most basic of supplies. No fancy schmancy machine to get to grips with, instead just some old shank buttons, a scrap of cloth and a good old needle and thread. Read the 'how to' after the jumpTuesday, 5 April 2011

Monday, 4 April 2011
I have to make this!!

Doilies plus wallpaper paste plus glue = fantastic looking lightshade!! Tutorial from the amazing dosfamily
Friday, 1 April 2011
New Bettyjoy website

Yay!!!! I finally got myself organised and got myself a new website with the help of my boyfriend (who designed it) and Applebox Designs (who did all the tech bit and the online design). There are workshops, tutorials, surface pattern design and more to have a gander at on there so go check it out the new Bettyjoy website here and let me know what you think.
Thursday, 31 March 2011
A different kind of writing desk

I saw this image on Kika Reichert's blog. I love a good soak and whats even better is if you have a good writing tray to pen your memoirs as you bathe. Check out this fantastic idea - you could knock one up using just old pallets and nice bit of varnish.
Sunday, 20 February 2011
Ribbon holder

If you have ribbons and bobbins lying about in a tangle looking unsightly, these ribbon holders will not only keep you organised but they make a really pretty creative statement.
Sew Super Necklace

This necklace doesnt even really need a tutorial as its as simple as threading bobbins onto a length of cloth or a scarf. The necklace is secured by tying a bow at the back.
Crafty stamp

Super simple craft stamp which you can use to decorate wrapping paper, or envelopes & letters (if anyone out there is old school and still writes letters) and anything else lying about.
Bobbin picture holder

This project is super simple and requires no crafty skills whatsover but looks effortlessly cool!
Fabric boxes

Fabric boxes look great and can be used to hold a multitude of things. I originally wrote this tutorial for Making Gifts magazine but thought I would share it here also.
These buckets make great storage solutions. You can use them to store smellies in the bathroom, socks and pants in the bedroom, crafts supplies in your studio or just put them on your shelves to pretty it up!.
The buckets are reversible, can be used with edge rolled up or down, depending on your mood and they can be stacked when not in use.
Tape brooch

A quick and easy accessory to make - perfect as a last minute gift too if you forgot to get one.
Saturday, 19 February 2011
Fabric covered bangles
 |
| materials |
 |
| fabric covered bangles |
Fabric wrapped bracelet
This is a super quick and easy accessory to make, either as a gift or as a little something to set off your outfit.
More after the jump
Fabric covered beads
 |
| materials |
 |
| finished fabric beads |
Fabric covered beads are really pretty but they are expensive and previously I always thought if I made my own I needed to use a wooden bead as a base, which in itself is pretty dear if you plan on making more than a few. Recently I came across these polystyrene balls of various sizes which they stock in John Lewis and online and thought that I could cover the polystyrene balls with fabric using a sort of decoupage method - I tried it and it works!
Friday, 18 February 2011
Typewriter Tags

I just found this old pic of one of the tags I made for my brother's wedding favours. Dead easy to do, providing you have access to an old fashioned typewriter (I picked one up in the charity shop for £5). I just scrolled the fabric into the typewriter, the same way you would with paper and typed away. I hole punched the holes in the cloth and added a little scrap of patterned fabric to brighten it up.
Isle be seeing you...
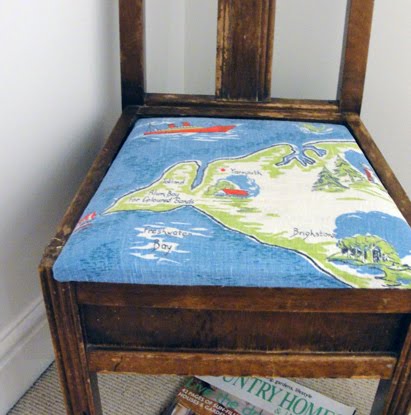
in all the old familiar places!!....Why not use an old vintage tea-towel to re-cover an old chair pad, like this one I made last summer, using one of my Grandma's tea towels featuring the Isle of Wight. I just lifted off the seat pad, drew around it directly onto the tea towel adding an extra 1 1/2 " all the way round, cut it out and used a staple gun to attach the new fabric to the underside and then put the pad back.
Belle Jar

I love bell jars, cloches or specimen jars, whatever you want to call them, I love them. But I cannot afford the pricey tag of an expensive bell jar, or a taxidermy crow which I would love to have inside one of my imaginary bell jars, so I looked online at DIY ways to make bell jars. Many people had used old domed carriage clock cases, removing the clock part and painting up the base of the clock, and that works really well, but I don't have a carriage clock and its raining hard today so I didn't want to traipse round the charity shops looking for one. I've been keeping lots of empty jars recently for various crafty projects and I was looking at an old pickled onion jar which was stacked upside down and thought it could make a sort of DIY version of a bell jar, which a bit of TLC. So I knocked up this little version. Its nowhere near as good as the real thing but it'll do for now, although I might make a couple more as collections often look better than single objects. (This afternoon, I was scrolling thru my blog and came back across this post, so my idea wasn't original after all, and they have a crow!)
Fabric Bangles

I love fabric covered bangles, but I can't justify spending over £10 on these, plus they always look better if you wear a couple at once, and that is easily £20 out of my near-empty purse. So I got a couple of charity shop plastic bangles for 50p each and re-fashioned them into something I'd be happy to wear on my wrist. All I did was cut a strip of pretty fabric slightly longer than the circumference of the bangle and twice as wide, then smothered the outside and inside of the bangle with PVA and stick the fabric onto it, tucking the edges into the inside of the bangle, then I gave the fabric another coat of PVA to seal it, left it to dry overnight and it was good to go.
Vintage Spool Buttons

I have been looking for a winter coat for a while but they are either prohibitively expensive or not my style. I had a bit of a brainwave last night when I saw an old summer khaki coat in the wardrobe. I have had the coat since my uni days, so over 10 years - eeek! I've altered it already a number of times. So I took hooded top (which I no longer wear as its covered in paint) and I cut the hooded top up the middle at the front and sewed it into my khaki coat - ta da...New winter coat!! It doesnt look too shabby either.
I was going to buy some nice wooden buttons to sew down the centre of the coat to jazz it up a bit and was about to leave the house to go button shopping this morning when I suddenly realised I didnt need to buy any wooden buttons, I could use the ends of old wooden spools.
Chalkboard Jars

Take an old glass jar and give it a good old wash and remove any labels by soaking the jar in warm water.

Unroll your sticky back chalkboard paper (I got mine from a local stationers)

Cut out a square, use the grid on the back to keep it straight.
Using a white chalk pen, your your design freehand onto your chalkboard square.

Peel back the sticky backing and stick the square to your jar. If you change your mind about the design, you can simply peel off the sticker and put a new one on - they are easy to remove.

Subscribe to:
Posts (Atom)